Preparing the vine for cuttings
Germinated cuttings for growing grapes are also called chibouks. For them, green or woody vine is used. Cuttings from green vines are prepared in early spring, before the plant juices begin to flow. The time for harvesting lignified varieties is autumn.
The cutting process is considered labor-intensive, but worthwhile.
Procurement time
Cuttings, lignified and green, are harvested at different times.
Green cuttings
Collection is carried out in spring (early summer). The weather should preferably be cloudy. Spring chibouks take root better.
Lignified cuttings
Planting material is prepared in the fall, during the period of pruning the grapevine. It is important to carry out the procedure before the onset of frost. At the end of autumn (beginning of winter) the vine contains maximum nutrients.
The advantages of using lignified material are explained, among other things, by a shorter harvesting and storage period and a probability of rooting of about 100%. Harvesting such cuttings begins 15 days after the bulk of the grape leaves fall off.
How to Determine the Suitable Vine
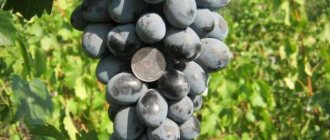
For cuttings, grape bushes with the best taste and high yield are selected. The vine should be brown, 8-12 mm thick, with 10 cm internodes. It is important to exclude the presence of dark spots, other damage and signs of disease.
It is better to use vines from healthy bushes of varieties that bear fruit in your region. It must be mature, with healthy kidneys.
Proper cutting of cuttings
Properly cut cuttings will produce good quality planting material.
Green (spring) options
The middle and lower parts of the shoot are optimal for rooting. The upper parts are susceptible to rotting, so it is not recommended to use them.
Rules for cutting spring vines:
- the cutting must have 2 leaves or more;
- the bottom sheet is removed;
- half of the top leaf plate is removed;
- oblique cut from below (approximately 45°);
- straight top cut;
- cutting length – 30-40 cm;
- thickness – up to 1 cm;
- 2-4 buds (eyes) are present.
Green stems are cut at the very beginning of flowering of the vine. An oblique cut helps further distinguish the bottom from the top. After cutting is completed, the shoots are placed in a container (bucket) and covered with a damp cloth on top to prevent drying out.
Lignified (autumn) options
Harvested from the middle parts of the shoot. It is not recommended to use damaged or crooked stems - this will negatively affect the quality of the seedling. Each cutting from which the tendrils and leaves have been removed should contain 2-4 buds. On the sides of the planted branches, grooves are made with a sharp object (needle, nail).
A cutting is considered to be of high quality if it is characterized by:
- hard to the touch, characteristic cracking when bent;
- absence of mechanical damage;
- brown color without brown specks;
- green at the cut level;
- appropriate sizes.
Grapes are able to develop the root system well on both woody and green shoots.
Slicing rules
For the procedure, prepare a tool in advance: sharpened pruners or garden knives. They are first disinfected in a saturated solution of potassium permanganate.
The vine is cut into 70-90 cm pieces. Many gardeners prefer to leave up to 6 eyes on the stem.
On a note! You can cut the vine into small pieces (2-4 buds each) if you plan to store the cuttings in the refrigerator.
Immediately below the eye, the vine is cut from below. The upper cut is made a little higher (about 1.2-1.5 cm), and it is directed in the direction opposite to the location of the kidney.
The vines are tied into bundles and must be labeled. Don't rely on memory. Over the winter, the shoots will change color, so without labels it will be difficult to understand the varieties.
Preparing cuttings for planting
The prepared pipes are sorted and processed. Processing consists of the following steps:
- daily soaking in water;
- etching (disinfection) with copper sulfate 5%;
- drying;
- sorting, tying into bundles;
- wrapping with plastic film;
- determination in a cool storage place.
The temperature in the storage room should not exceed 5° throughout the winter. Excessive humidity in the storage area may cause rotting. Culling should be carried out in a timely manner.
Preparation stages
- The preparatory period includes several stages:
- Proper storage after pruning
- If storage rules are followed, the amount of rejected material is reduced significantly.
The following should be provided:
- cleansing of mustaches, small stepsons, foliage;
- the formation of bundles when tying with rope (non-solid wire);
- keeping in damp sand of the basement (or in an equipped trench).
Trench equipment rules
The hole should correspond to the length of the chibouks. It cannot be located near groundwater. Approximately 9-10 cm of sand is poured onto its bottom. The soil layer above the cuttings must be provided up to 40 cm. To avoid freezing, insulate with leaves, straw, sawdust and cover with polyethylene film.
In the refrigerator, the optimal temperature place for storing planting material is the door. Before storing for storage, the material is soaked for up to 2 days in cold water and placed in a polyethylene bag. Chubuki are taken out of storage in February (possibly from the end of January).
Processing and furrowing
After removal from storage, washing is carried out in a low concentration solution of potassium permanganate. The cut areas are lightly trimmed with a previously disinfected knife to light green skin.
Below, with a sharp object, longitudinal grooves are made on both sides. They and their sections are processed by Kornevin. This is a kind of stimulation of root formation (furrowing).
Soak
The material is placed in water for 1-2 days. It is practiced to refresh the sections and remove the eyes, except for the top 2. Add water as it dries.
To form the root system, the cuttings are placed in a sunny place. After 14-18 days, roots or their rudiments from 3 to 7 cm are formed. Shoots up to 5 cm are formed from the eyes. The cuttings are ready for planting.
If you have several varieties, do not forget to label (label) them.
To maintain the quality of the material, you need to take the following actions:
- if it dries out, moisten it and place it in water;
- If covered with mold, wipe with potassium permanganate.
In the absence of visible damage or disease, the viability of the chibouks is confirmed by cutting the bark and ascertaining living wood of a bright green color. The buds should be green and dense in cross section. Brown color means the death of the eyes.
If there are already leaves and roots have not yet formed, such shoots should not be rooted. They are not very viable and will quickly wither, because all the strength and energy is spent on the development of leaves.
The material selected after culling must be treated with potassium permanganate, cut off on both sides, and soaked in a growth stimulator for up to 2 days.
You can prepare a growth stimulator yourself. To do this, add honey and aloe to the water, 1 spoon per 10 liters. Apply the grooves vertically, rubbing the stimulator into them.
How to store chibuki
Before planting, the planting material is prepared : left in water for a day to saturate it with moisture and not dry out over the winter. For long-term storage, a constant temperature of no higher than +4°C is required.
To disinfect, the cuttings are placed in a weak solution of potassium permanganate or copper sulfate for half an hour. Then dry in a shaded place. If desired, the sections are lubricated with plasticine, wax or molten paraffin. This will retain moisture in the branch until germination begins.
There are several storage methods.
Dropping on the street:
- Make trenches 50 cm deep, the length depends on the size of the shoots.
- The bottom is sprinkled with a 10 cm layer of sand.
- Bundles of blanks are laid out.
- Sprinkle with a 30 cm layer of earth and cover with a piece of film.
- To drain water, they dig a groove along the edge of the trench.
In a refrigerator:
- Soak planting material in cold water for 1-2 days.
- The bundle is wrapped in paper and then in a plastic bag or placed in a plastic bottle.
- Place in the refrigerator in the vegetable compartment or on the door.
The cuttings are checked once every 2 weeks . If some show signs of mold, they are all sorted out and put into a new bag. Dry cuts are immediately moistened.
In the cellar:
- The room is treated with a sulfur bomb or lime solution and wait for all surfaces to dry completely.
- 15 cm of wet sand is poured into the bottom of wooden boxes.
- Bunches of cuttings are laid out and covered with sand so that they are not visible.
Once a month, the planting material is inspected and the sand is moistened . Dried cuttings are immersed in water for 6 hours, then dried as usual.
Important! To prevent fungal infections, the chibouks are shifted twice during the winter.
Suitable storage temperature in the basement is +4...+5°C, humidity is about 60%. At higher rates, the grapes will begin to deteriorate.
In regions where there is constant snow cover in winter , prepared cuttings are wrapped in film, covered with a layer of snow of at least 30 cm and trampled.
Planting cuttings
The quality of planting largely determines the entire subsequent process of growing the plant. There are several ways of rooting: in sawdust, in soil, in water.
In the sawdust
Sawdust, slightly moistened, is placed in the container, in which bundles of cuttings are located. The container is placed in a warm place. The sawdust is moistened every 5 days. The period until the root system appears is 3 weeks.
In the ground
Prepared containers (plastic pots, glasses) are filled with the prepared nutrient substrate.
The substrate is prepared by mixing:
- garden land – 35%;
- humus – 25%;
- rotted sawdust – 25%;
- sand – 15%.
A drainage layer (expanded clay, pebbles) is installed at the bottom of the container. When adding soil mixture, the cutting is installed at a slight angle, so that only the upper eye appears on the surface.
In water
Chubuki are simply placed in a glass jar with water.
Chubuk trees with regrown roots are planted in a special cardboard or plastic container with soil (containers, boxes, pots, bags). Holes are made in them to remove excess liquid. Preferred container sizes: height up to 25 cm, diameter up to 10 cm.
For subsequent transportation to the vineyard, it is convenient to place small containers in larger boxes.
When there is a large amount of planting material, greenhouses are used. The soil for rooting must be fertile. The thickness of the soil layer is up to 12-15 cm. At the top - up to 5 cm of river sand. Before planting, the soil is moistened until it is completely saturated.
Landing requirements:
- planting depth – 3-5 cm;
- planting frequency – every 10 cm;
- humidification and film coating are provided;
- the need for kilching.
The cuttings are placed in the soil mixture, covered, and watered.
Kilching is placing the chibouks in a plastic container with wet sawdust over a heating radiator. Goal: The bottom should be warm and the top should be cool.
Blank
Cuttings or stems are necessary for obtaining planting material, as well as for grafting. They represent a piece of young annual growth of grape shoots; they can be lignified (ripened) and green.
Beginning gardeners often confuse seedlings and cuttings. The difference is significant: 1-2 year old plants with a root system and growth, used for planting in a permanent place, are seedlings.
The scheme is simple: winegrowers prepare cuttings in the fall, save them until spring, then root them and then plant them in the ground. The options are different. The summer resident chooses the most convenient for himself from the following methods:
- rooting, growing in glasses at home, moving to school;
- rooting and immediately after this (if weather conditions permit) planting in the school.
Regardless of what kind of grape seedling (one- or two-year-old) you want to get, you first need to prepare the required number of cuttings. Before planting in the spring, chopped chibouks can be stored in the cellar, basement, or refrigerator. The choice of location depends on the capabilities of the owner.
Caring for cuttings
Caring for seedlings involves regular watering and spraying.
When caring for them, you should follow the following rules:
- Provide moderate soil moisture.
- Don’t forget to control emerging weeds.
- Use complex fertilizers to feed seedlings. After a week, feed the planted plants with potassium and wood ash.
- Observe lighting conditions.
- Carry out periodic pest control.
The correctness of rooting is indicated by the development of the root system earlier and the appearance of greenery (leaves). The reverse pattern indicates a violation of the process.
Humidity and watering
Care rules include ensuring high humidity. For this purpose, spraying with warm water (20-25°) is recommended up to 5 times a day. Starting from 10-12 days, when root buds appear, reduce the number of sprayings to 3 per day.
Watering is carried out as the soil mixture dries (1-2 waterings per week). It is produced through a tray in order to avoid rotting of the root system.
Temperature
To germinate cuttings in water, the temperature outside is about 20°, and inside the jar – up to 38°. At high temperatures during storage of germinated cuttings, the intensity of nutrient consumption increases. This is fraught with loss of viability by the time of rooting. And extremely low temperatures lead to freezing and drying out of the eyes. The optimal temperature for preserving cuttings is from 0 to 5°.
Light for cuttings
Containers with pipes should be kept in a bright place, but direct penetration of sunlight should be excluded. They can cause burns on grape leaves.
The use of fluorescent lamps is considered effective.
Preparing for planting in open ground
In the spring, the material prepared earlier is subjected to processing, removal of defects, rotten, dried pipes. When cut, the cutting should be light green and release juice. Otherwise, the material is unsuitable for planting in open ground.
To prepare for planting, seedlings should be hardened off (about a week before planting). To do this, when the formation of the root system is completed (in a few weeks), you need to open the container for 10-12 minutes, adding time until it is completely opened. Hardened seedlings are ready for planting in a permanent place. You can start working on it if you have 2-3 sheets and formed white roots (formed root system).
Chubuki are ready for landing if:
- they are light green in color where they are cut;
- When pressed, a transparent liquid is released.
If the sections have darkened, cuttings should not be used for rooting. As a rule, they are ready for transplanting into open ground by May-June.
Grape cuttings provide gardeners with planting material in large quantities, without special costs and in a short time.
The main life hack for storing cuttings
In fact, preserving cuttings until spring is not particularly difficult; grapes forgive many mistakes of a novice winegrower. But, unfortunately, he does not forgive himself, forgetting to sign the cuttings. Yes, the main life hack is not something complicated, but our belief that we will remember everything, but in the spring it turns out that we didn’t remember anything, at least that’s how it is for me.
To mark cuttings you can use: paint marker, permanent marker, masking tape. In my opinion, the most convenient and reliable thing is a paint marker. In Leroy Merlin, one such marker costs 138 rubles, it will last a long time, and can be used everywhere.
When to prepare planting material
How to prepare grape cuttings? To begin with, it is worth emphasizing that such manipulation is carried out in the autumn. Because in winter most of the branches and eyes are destroyed by frost. That is why harvesting grape cuttings in the fall is much better compared to the spring procedure.
For harvesting to be successful, you will need to select suitable pipes before the first frost. As a rule, harvesting begins in September and lasts until early October. It is worth noting that the optimal time for such manipulation largely depends on your region of residence.
The fact is that in some areas the cold begins already at the end of September, so it is necessary to carry out this procedure in time.
What are the advantages of propagating grapes from cuttings?
An error or outright deception will not be discovered immediately: at best, after a couple of months, at worst, after a year. In order not to reproach yourself for being gullible and not to waste time and money in vain, you need to master the technology of growing seedlings and grapevine cuttings - winegrowers call them “cuttings” and “chubuks”.
Saving money
Anyone who has ever seen grape seedlings for sale has noticed that they all look alike - a rooted section of a vine with a blossoming bud or an already grown shoot. It is not difficult to grow the same seedling yourself. Summer residents and winegrowers will be happy to give the vine for rooting - when pruning a bush, up to 90% of the vine is cut off.
Cuttings for rooting are also sold by breeding stations at a price several times lower than that of a grown seedling. The advantage of such a purchase is a guarantee of compliance with the variety stated in the catalog.
Error eliminated
When purchasing a cutting, even in a specialized center, there is a certain risk of mismatching the variety. Endowed with a friendly neighbor in a summer cottage, the vine does not raise any doubts.
Sometimes even the name of the variety is unknown, but the taste of the berries from the mother bush is well known. Details of proper care are usually included with the vine piece.
Renewal and expansion of the vineyard
The vineyard is aging - the grapes and berries are getting smaller. Sooner or later, you have to replace very old bushes, replenish dead ones, or plant new plantings. When pruning, a huge number of vines are formed, which can be used for rooting and producing seedlings.
How to prepare seedlings in the fall
In order for the cuttings to tolerate storage conditions well and begin to develop quickly after planting, it is necessary to take into account the harvesting rules.
How to select a vine for cuttings
Healthy, fertile bushes are selected for cutting chibouks. The vine from which it is planned to select a shoot must be of a uniform color (dark straw) without signs of disease or insect damage. The diameter is 5-8 mm. Thin and thick shoots are not recommended to be harvested; preference should be given to a branch that is not old, but well-ripened.
You can check maturity using iodine. You need to lower the cut into a 1% solution and see how its color changes. Unripe specimens will remain light green, while the suitable variety will take on a purple-black hue. The middle part of the branch is selected for the cutting, since the top is too young and underdeveloped. Chubuki are made from the 4th eye; strong and fertile shoots grow from such preparations.
Experienced winegrowers advise choosing for pruning the vine that developed on the sunny side; branches sprouted in the shade grow worse. It is not recommended to use fat and shoots for cuttings.
Ways to take grape cuttings
You can cut a long branch with 6-8 eyes for storage, from which you can trim it for germination in the spring. You can also prepare one of the following options:
- shortened shoot with 1-2 eyes (used more often for grafting);
- medium-length trims for 3-4 eyes (this method is the most popular);
- long cuttings with 5 or more eyes.
Disinfection of seedlings
Before sending the pipes for storage, you need to disinfect them. There may be microorganisms and bacteria on the trimmings, which will begin to multiply intensively in conditions of moisture and heat. This will destroy all planting material.
To prepare a disinfection solution, you need to dissolve a teaspoon of copper sulfate in a glass of water. Spray the pipes generously with liquid poured into a spray bottle and allow them to dry naturally. Disinfection will protect planting material from the formation of mold and mildew during storage.
Sliced chibuka into 4-5 eyes
Accelerated propagation of grapes from shortened cuttings
For many, the story of rooting cuttings in a jar, growing them in a schoolhouse, and then replanting may seem too complicated and long.
For too busy summer residents, there is a method that combines all 3 operations. For planting using the accelerated method, you will need stems from mature vines with a diameter of 8-10 mm.
The number of internodes is not of fundamental importance - after winter storage the cuttings must be soaked for 2 days and stratified.
Stratification is nothing more than keeping the chibouks in a damp, cool, dark place. The corresponding conditions arise if you wrap the pipes with a damp rag and place them in a black bag with ventilation holes for 2 weeks. Periodically, it is necessary to unwrap the bag and moisten the rag.
After stratification, the chubuk tree with root buds is planted in a shrub - this can be a greenhouse or greenhouse.
- The bed is prepared with a supply of nutrients for 2 years.
- Chubuki are planted at a distance of 10 cm from each other, at least 30 cm between rows.
- The chubuks are immersed in the soil up to the upper eye vertically or with a slight inclination.
- The planted cuttings are well watered and covered with glass or film.
Further care of the plantings does not differ from the usual method.
Storing pipes in storage
The easiest way to preserve grape stems until spring is in the so-called storehouse.
- Is there a financial benefit to growing your own potatoes, or is it more profitable to just buy them?
Dig a trench in the ground 40-50 cm deep and slightly longer than the cuttings, pour sand at the bottom, lay the cuttings on it, cover them with earth and be sure to make a mound so that rain and melt water do not accumulate in this place.
In such a trap, the cuttings will overwinter wonderfully, but you will only be able to get them when the ground thaws. If you plan to root grapes in March, this storage method is unlikely to suit you.