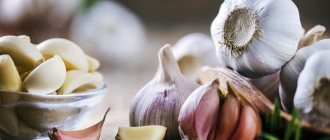
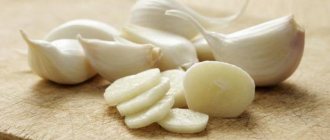
Garlic is an indispensable ingredient in many dishes, adding spiciness and aroma to them. In addition to its bright taste, it has established itself as a fighter against pathogenic bacteria and fungi. Garlic is grown in both autumn and spring seasons, depending on its type. Despite the fact that garlic is extremely unpretentious, its shelf life is not that long, especially if you plant it in the fall, because planting garlic for the winter requires a savvy gardener. There are several ways to propagate garlic, depending on the planting material, and each of these methods requires its own individual approach.
Planting garlic for the winter
Winter and spring garlic: how to distinguish?
Depending on the time of planting, winter and spring garlic are distinguished. If your goal is to plant garlic in the fall, then the winter option is your choice. Spring garlic does not like low temperatures and is planted in the soil when spring arrives. It is quite easy to distinguish winter garlic from spring garlic by several key characteristics:
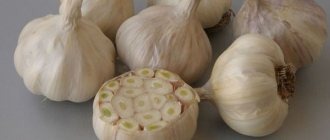
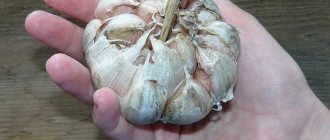
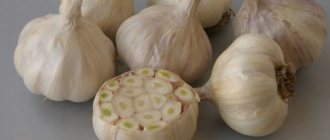
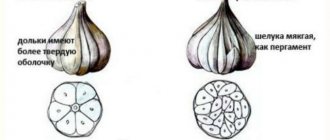
- Structure. The head of spring garlic does not have a stem, while in winter it is clearly visible. Spring garlic consists of a large number of small cloves (up to 25 pieces), while winter garlic has a smaller number of larger cloves (from 4 to 12 pieces). The location of the cloves also differs: in winter garlic they are located in one row, in spring garlic they are located in several rows;
Winter garlic cloves are larger, so less can fit in the head.
- Taste. Garlic adapted to low temperatures has a sharper and sharper taste, while spring garlic has a mild taste;
- Storage and use. Spring garlic can be stored throughout the entire winter season; it does not dry out and does not lose its taste, while winter garlic barely survives extreme cold. It is eaten in summer and autumn. Winter garlic, unlike spring garlic, is often used as seed material.
Spring garlic can be stored much longer than winter garlic without losing its aroma
Prices for winter garlic
winter garlic
Site selection and soil preparation
Garlic beds are laid out in a high place with good lighting. Lowlands are not suitable - stagnant moisture will cause rotting of autumn plantings and will not allow early sowing of spring ones.
The acidity should be neutral; the best option is sandy or loamy soil. If the soil on the site is acidic, add slaked lime, ash or chalk to it.
Be sure to observe crop rotation:
- onions are a bad predecessor - they leave garlic as a “legacy” of pest larvae and general diseases;
- carrots greatly deplete the soil, so garlic will not grow well after it;
- peppers, beets, potatoes and cabbage are also undesirable as predecessors;
- Areas where cucumbers, zucchini, pumpkin, legumes, grains and cauliflower previously grew are perfect.
Garlic inhibits fungal spores and repels harmful insects, so it can protect other garden crops. It will be an excellent neighbor for eggplants, potatoes, carrots, peppers, tomatoes, strawberries, and berry bushes. The exception is legumes - garlic planted closely will suppress them.
Before planting, the following preparatory work is carried out:
- The bed is dug up with a shovel or special pitchfork. For winter garlic, superphosphate, potassium salt and humus are added to the ground in amounts of 30 g, 20 g and 5 l, respectively. Then they wait until the soil calms down and settles, and only after that the cloves are planted.
- You can fertilize the soil for spring garlic both in autumn and spring. During the autumn preparation of the beds, a mixture of double superphosphate, compost and wood ash is used. In spring - ash and humic fertilizers.
- If you use organic fertilizers, use only rotted ones and be sure to mix them with soil. Fresh manure is contraindicated - it causes tops to grow rapidly to the detriment of root crops.
When to plant winter garlic?
There are two types of planting: traditional, in which the garlic is buried to a depth of up to five centimeters, and deeper, which involves immersing the garlic fifteen centimeters in the soil. Many gardeners prefer deep planting due to the fact that the better the garlic is protected by layers of soil, the more comfortably it can withstand the coming cold, and the faster it takes root.
Planting dates depend on the depth to which you want to immerse the garlic in the ground.
So, depending on the time of planting, you should focus on the following dates:
- With traditional planting, the appropriate day should be chosen two or three weeks before the expected frost. In the regions of the central zone, garlic is planted from late September to mid-October. The southern regions can afford to plant until November;
- When deep planting, garlic is planted between the twentieth of August and the first of October in a temperate climate typical of the middle zone. In the southern regions it is also allowed to arrive late until November.
When planting garlic, you should be guided by the weather conditions of your region.
Important! Since frosts occur in different regions at different times, it makes no sense to name specific planting dates. Gardeners are advised to focus on the climatic characteristics of their regions and carefully monitor weather forecasts before planting day.
Common planting mistakes
Keep in mind that the wrong timing can cost you the whole harvest, so you should be especially careful about timing. Thus, garlic planted early and left in the ground for too long will begin to sprout, which will negatively affect its taste, since it will redirect all its nutrients to the roots.
Garlic left overexposed to soil will inevitably take root, making it difficult to store and use.
If you plant garlic too late, it simply won't have time to take root well. And with the arrival of frost, it will experience additional stress and, in the worst case, freeze, which will lead to the death of the plant. In cold regions with an unpredictable climate, it is recommended to additionally cover the planted garlic to avoid unpredictable consequences. Dried plant stems covered with film are ideal as material.
Video - Tips for planting winter garlic before winter
Frost protection
Shelter in the fall is not made immediately after planting, but later, when the soil freezes by 1 or 2 cm. The optimal height of the cushion in the southern regions is 15 cm, in the northern regions - up to 30. Almost any organic material can be used as a protective material, for example:
- Straw;
- Mown weeds;
- Hay;
- Fallen leaves;
- Sawdust.
You need to use organic matter carefully, as it can introduce fungi, insect larvae and pathogens of infectious diseases. For prevention, the material must be treated with fungicides and insecticides. Weeds can seed the garden with their seeds, making weeding difficult for the next season. To prevent this from happening, weeds must be mowed before flowering begins.
If it is not possible to process the covering material, the beds with garlic are covered with polyethylene, on top of which organic materials are laid. In the spring, the cover is carefully removed and taken out of the area on the same oilcloth, being careful not to spill it onto the ground.
Types of planting material
With proper planting and suitable soil, garlic successfully takes root and adapts to even the most severe frosts. Toward the beginning of March, the plant normally begins to produce green shoots. By summer, arrows appear at the planting site, which, as a rule, are removed if the gardener wants to improve the quality of the upcoming harvest. If you want to get planting material, you can leave the arrows from the largest bulbs.
The timing of harvesting depends on the type of planting material you choose.
As they grow, the arrows move from a spiral state to a straight one. At the moment when the arrows straighten completely, it makes sense to harvest the crop that will appear on the peduncle. To obtain a harvest, you need to follow the instructions step by step:
- Carefully remove the plants from the soil and tie them into bunches;
- Store the bunches in a dry, warm place for at least thirty days;
- A month later, carefully examine the plant and roughly divide it into two parts: bulbs and heads with bulbs. It is the bulblets that are the most valuable planting material.
Bulbs are smaller in size than cloves, but are capable of producing excellent yields
Important! In no case should you delay collecting the bulbs, because if they fall into the ground before you get to them, small garlic bushes will grow from them.
Planting different types of material
The timing of its immersion in the soil will depend on the planting material you prefer.
Table 1. Types of planting material
| View | Description |
cloves | Taken from mature bulbs. Ideal for autumn planting |
Bulbs | They are very fragile and do not tolerate frost well, so when planting them it is better not to take risks and plant them in April to guarantee a harvest. |
Single-pronged bulbs | They grow when bulbs are planted in the soil and are capable of producing a harvest when replanted. |
Single-toothed bulbs can also be used as seed
When choosing a specific planting material, you should focus on the time frame. So, from the cloves you will get a ripe bulb within a year after planting. In order for the bulbs to produce a bulb, they need to go through two stages, which respectively take two years.
Features of planting bulbs
Although bulbs require more favorable planting conditions, they are considered the most effective way to achieve garlic growth. The fact is that one winter bulb contains up to twelve cloves, while one arrow contains up to a hundred miniature bulbs, each of which is capable of bearing fruit.
There are many times more bulbs in one arrow of garlic than in one head of cloves.
Important! Before planting, it is recommended to keep the bulbs in the refrigerator or cold cellar for several days to increase their yield.
As the bulb matures, we get a single-toothed bulb, the miniature clove of which reaches a size of no more than three millimeters. If desired, single-clove onions can already be used for cooking. However, if you want to finish the job, you should replant the one clove in the soil in the autumn season, after which it will develop into full-fledged large heads of garlic.
Despite the fact that bulblets are planted in the off-season, spring is more suitable for them
Planting methods
Garlic can be planted in three ways: family cloves - cloves, seed bulbs or annual bulbs - sets.
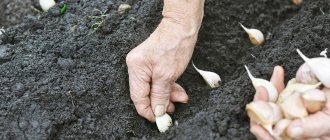
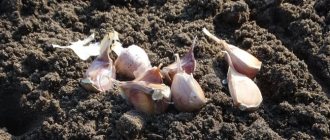
With cloves
Form a bed about a meter wide and loosen it thoroughly. Make indentations every 15-20 cm in the row, then water them generously. Cover the bottom with ash or sand. The depth of the cloves is 5-6 cm. After finishing the work, sprinkle them with a centimeter layer of humus.
If you are planting a vegetable before winter, do not forget to mulch the bed with peat or other organic materials.
Watch a video on how to plant garlic cloves.
Bulbs
Bulbs are the seeds that form in the inflorescences of winter varieties of garlic. The largest of them are chosen as planting material. Growing a crop from bulbs rejuvenates and heals the plant, which is why gardeners periodically practice it.
Pre-winter sowing is carried out at the same time as planting the cloves. Furrows are made on the surface of the bed every 10-15 cm. Depth - up to 3 cm. The bottom is sprayed with potassium permanganate diluted in water, after sprinkling the ground with sand and ash. The seeds are laid out at a distance of 2-3 cm from each other, bottom down. The bottom is wider than the apex and is marked with a scar. When in doubt, place the grain on its side.
For the winter, mulch the bed with 2 cm thick peat or sifted compost. In spring, standard care will be required - watering, loosening, weeding. As soon as the tops turn yellow and the neck becomes thin, you can collect the sets. To do this, choose dry weather, and then the harvest is dried under the sun in the open air for three days. Until the next planting, it is stored at room temperature.
In the northern regions, bulblets are often planted in the spring due to the fact that they may not survive winter frosts. Until February, they are stored in a dry, warm place, and then transferred to a room with a temperature of 0 degrees. A refrigerator or basement is suitable for this. In mid-April or May, the seeds are processed and planted in open ground. By autumn the seedlings will ripen. It can be left to overwinter in a garden bed under a peat cover.
Sevcom
Single-toothed bulbs can be grown independently from bulbs or purchased at the market. For sowing, choose strong, dense and healthy specimens. If you want large bulbs, plant in the spring and then overwinter the beds. If you need a medium-sized crop, do the usual winter planting. Planting pattern: 20 cm between rows and 10 cm between seedlings.
Complementarity with other vegetables
Before planting garlic, you should always consider its predecessors. Garlic is quite demanding of the crops that grew before it, and if you ignore this factor, you should not hope for a good harvest. The optimal predecessors for garlic are annual vegetables with relatively short ripening periods. These vegetables include:
The shorter the ripening period of a vegetable, the more likely it is that the garlic will take root after it.
Garlic takes root very poorly in soil on which various root crops previously grew. The peculiarity of growing root crops is that they thoroughly deplete the soil, which needs time in order to fully recover and regain the ability to nourish new plants. In addition, root crops simply ripen late, which is why garlic planted after them runs the risk of simply not having time to germinate.
Root crops take all nutritional resources from the soil, which requires subsequent rest
Besides root vegetables, the main enemy of garlic when planting is the garlic itself. You should mark in advance the areas where you grew garlic and under no circumstances replant it there in the next three or four years. This will allow the soil to rest and recover for further work. The same rules apply to onions.
Step-by-step instructions: how to plant a winter variety in open ground?
Before proceeding with direct planting, it is necessary to prepare all the tools and materials:
Inventory . If you plant garlic in rows at a shallow depth, you will need a hoe and a rake. If you plant in rows at a greater depth (7 - 9 cm), then it is worth preparing a hand plow. When planting to a depth of more than 10 cm, it is more convenient to use a peg and a hammer. For convenience, you can draw a mark on the peg where it will be stuck into the ground.- The soil .
The choice of location for the garden bed is important - garlic is a demanding crop. To get a good harvest, acidity must be neutral or reduced. The bed is oriented from north to south and should be raised if groundwater lies close to the surface. The soil must be prepared 3–4 weeks before planting. To do this, 6–10 kg of compost or 40 grams of superphosphate and 10 grams of potassium chloride per sq.m. are evenly scattered. Then the bed is dug up and carefully leveled. In the remaining time, the soil will settle and gain enough moisture for garlic to grow. 2 - 3 days before planting, it is necessary to scatter urea at the rate of 30 g per square meter and spill with water. - Planting material . The cloves are carefully sorted and selected - the seed must be large, healthy and without damage. To speed up germination and better development, it is advisable to germinate the seed material. Before planting, sprouted cloves must be sprayed with a 1% solution of copper sulfate, and immediately before planting, soaked for 5 minutes in a solution of Fitosporin. Similar operations are carried out for bulbs.
When everything is ready, the soil has settled, the seed is ready and the timing allows, you can start planting :
- When choosing a location, you need to pay attention to previous crops. Garlic, potatoes and onions have similar diseases and pests, so it is not recommended to alternate them. It is optimal to plant garlic after tomatoes, cucumbers, cabbage, pumpkins or zucchini. Read more about which crops you can plant garlic after and what you can plant after garlic here.
- Planting depth depends on climatic and local conditions and varies in different parts of Russia. Most often they are planted at a depth of 5-7 cm to protect the plant from frost and freezing. In recent years, a scheme with different planting depths has become widespread - even rows are planted to a depth of 5-7 cm, and odd rows to a depth of 10-15 cm. This allows planting to be compacted and a larger harvest to be obtained from the same area. When planting bulbs on seeds, the depth should be 3-5 cm.
- The planting pattern also depends on climatic conditions, but to a lesser extent. Most often, garlic is planted using a 20 cm row spacing and 15-20 cm between plants. With different levels of precipitation, you can reduce the width of row spacing and stagger the placement of plants. Bulbs to obtain cloves can be planted according to the scheme 10 by 10 cm or 10 by 5 cm.
The process of planting at a shallow depth is as follows: using a hoe or a small plow, grooves are cut into which the planting material is carefully placed. After laying, the row is spilled with Fitosporin and buried. When all the rows are planted, the bed is additionally leveled with a rake and mulched.- When planting at a depth of 10 cm or more, cutting grooves becomes difficult. Therefore, a peg and a hammer are used. The thickness of the peg is selected so that the teeth easily fit into the resulting hole, but do not turn over when dropped. The peg is driven to the required depth and carefully removed. A little Fitosporin solution is poured into the resulting hole, then the clove is lowered with its roots down, a little earth is poured into the hole, watered and filled completely.
We can advise all our readers who are interested in planting garlic to read interesting and useful articles on how to plant a vegetable using a planter and how to grow it at home.
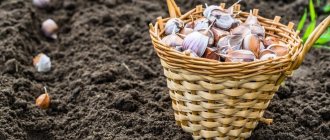
Preparing winter garlic for planting
In order for winter garlic to delight the gardener with its pungent taste and not fail during storage, it is necessary to properly prepare it for immersion in the soil. Preparation of garlic consists of several steps. The first of these is the selection of suitable cloves and their processing.
The quality of the selected bulbs directly affects the quality of the upcoming harvest.
Selection and processing of planting material
- Only freshly harvested garlic is suitable for planting. The most mature and pre-dried bulbs are selected as suitable candidates;
- The bulbs should show no signs of mechanical damage, disease, mold or rot. Remember that even if the disease affects only one bulb, then all the others are in potential danger. Therefore, if you want the next harvest not to rot in the ground, treat the selection with the utmost severity;
Any hint of rot or mold should be a good reason to reject the bulb
The size of the planted cloves will directly affect the size of the productive bulbs
Disinfection of planting material
It should be remembered that even the most thorough disinfection does not always save the cloves from infection. However, at the same time, you need to continue to do everything that depends on the gardener to influence the quality of the harvest.
From ticks and nematodes
The main enemies of winter garlic are garlic mites and nematodes, which feed on the contents of the cloves and destroy them from the inside. To combat these parasites you need to take the following simple steps:
- Dissolve one tablespoon of salt in three liters of water;
- Keep the cloves in this solution throughout the day.
Signs of a clove being damaged by a garlic mite
An alternative to saline solution is ash lye, which effectively prevents pests from infecting the plant. To prepare it follow the recipe:
- Dilute half a kilogram of ash with three liters of water;
- Stir the composition for the next ten minutes, and then boil;
- Let the solution cool and brew. As a result, a cloudy layer should stand out closer to the surface, which is called ash liquor;
When straining the solution, make sure that no waste gets into the final product.
Important! It is recommended to wear gloves when treating bulbs with ash lye, since the solution can irritate unprotected skin of the hands.
From fungus
To prevent the spread of fungus over the cloves, there are several equally effective methods:
- Dissolve one teaspoon of copper sulfate (without top) in a liter of water. The cloves are dipped into the resulting composition for half an hour. After processing, they are immersed in the soil without repeated flushing;
Copper sulfate has a rich blue tint
In addition to homemade compositions, it is possible to treat plants with a fungicide solution known to most gardeners called “Fundazol”. It can be purchased at any specialty store for gardeners.
Fundazol is sold in powder form, which must be diluted in water according to the instructions.
Prices for Fundazol
foundationazole
How to choose the right garlic for planting
Large, regularly shaped garlic heads from the supermarket just want to be used for planting! But don’t rush, the attractive appearance of this vegetable does not mean its ideal germination and cultivation.
What to look for when buying garlic for planting:
- For planting, it is better to buy freshly dug garlic at the market, with roots.
- If you come to choose planting garlic in the store, pay attention to the bottom of the heads. Imported garlic (usually Chinese or Japanese varieties) undergoes special treatment of the roots for long-term storage. A smooth bottom without a single root indicates that the manufacturer has processed the vegetable so that it does not germinate. This means that in your garden there may be problems with the germination of this crop.
- Feel each garlic clove; they should not have any soft spots.
- Unfold one of the cloves. It should have a smooth milky surface without blemishes or yellowing.
So, your planting garlic should have emerging root tubercles, a firm consistency and a healthy appearance. If you managed to buy exactly this one, great! But it is much safer to prepare planting garlic on your own.
Preparing garlic seedlings yourself
If you are satisfied with the variety you are growing, then it is advisable to prepare the seed material yourself annually. For this, leave 5-7 heads with arrows in the summer. As soon as the film of the inflorescence bursts, cut off the arrow and dry it. Small teeth are ripe inside. They need to be collected and sown in furrows at the same time as garlic (can be sown in spring). Next year, “one-toothed” plants grow from the seeds - this is the best planting material.
Awakening dried cloves
It also happens that the gardener was late and did not have time to immerse the cloves in the ground on time. If the delay is insignificant, then it makes sense to use a method through which the cloves can be brought back to life. The procedure is as follows:
- Immerse the cloves in warm water and keep them in it for two or three hours;
- Take moss or sawdust and moisten it. Place the soaked cloves in them;
- Leave the cloves in a warm, dry room for several days. It is advisable if there is a battery nearby, which will speed up the drying process;
Warm temperatures and low humidity will speed up the germination of cloves
The cloves should be planted in soil disinfected with potassium permanganate.
In order for the harvested garlic crop to last longer, it is important not only to properly process the planting material, but also to select suitable conditions for subsequent storage. Below we talk about which storage options allow garlic to last as long as possible.
Garlic storage options
Is it possible to plant spring garlic in the fall before winter?
Spring garlic can also be planted before winter. In this case, the growing season will increase, and the heads will be much larger (from 70–80 to 100 g). The optimal time is the end of September. In the south you can do this 1–2 weeks later, and in the Urals and Siberia - 7 days earlier.
Before starting work, spring garlic should be processed in exactly the same way as during classical planting in spring. However, there are two differences:
- The embedment depth will be greater: 5–8 cm instead of 2–3 cm.
- Coarse white sand should be placed at the bottom of the hole. Then insert the cloves. Then fill it with sand again and level it with fertile soil.
Plantings are covered with a large layer of mulch. You can use dry leaves, straw, sawdust and other available materials.
Preparing beds for winter garlic
In order for garlic to take root well, you need to take care of the proper quality of the soil. It should also be borne in mind that not all types of soil are suitable for planting garlic, regardless of their condition. The best soil for growing cloves is considered to be soil with a neutral alkaline reaction, for example, loamy or clayey.
Adjusting soil acidity
If your soil is considered acidic, then it is worth alkalizing it. Alkalinization should not occur simultaneously with planting garlic. It is advisable to carry it out before planting the previous crop. In order to reduce the acidity of the soil, it is necessary to distribute three kilograms of fluff lime per square meter.
Fluff lime can be easily purchased ready-made at a hardware store.
Ash is also suitable as an alternative material for soil treatment. The amount of product depends on the initial properties of the soil; the approximate consumption of material ranges from seven hundred grams to three kilograms of ash per square meter.
Prices for fluffed lime
fluff lime
Soil fertilization
If it is necessary to fertilize the soil, it is advisable to carry out the plan at least two weeks before planting. It is better to use humus rather than manure as a material:
- Loosen the soil using the spade blade;
- For each square meter, distribute six kilograms of humus, thirty grams of superphosphate and about twenty grams of potassium salt;
Humus can be a worthy alternative to manure
You can read more about the methods of autumn soil fertilization on our portal.
Important! Before covering the area with film, it is advisable to dig up the ground to a depth of at least thirty centimeters.
Boarding restrictions
Planting garlic should be avoided in the following cases:
- Groundwater flows under your site at a fairly close distance;
One of the ways to combat groundwater is to create a drainage canal
Manure negatively affects the growth of garlic in the soil and reduces its immunity
Features depending on climate zone
Depending on the climatic zone and local conditions, the method and planting pattern differ . There are no clear recommendations; depending on the current year and local temperature conditions, the depth and planting pattern may differ slightly.
In the temperate continental climate zone - the Moscow region and central Russia - the planting pattern should be 20 by 25 or less. The depth should be more than 5 cm so that during frosts after thaws there is no freezing of the seed. It is optimal to plant garlic at a depth of 7-9 cm and additional mulching for the winter.
In the southern part of Russia, planting can be done at a shallower depth and more often . Landing according to a 20 by 20 or 20 by 15 staggered pattern is allowed. With regular mulching, you can plant to a depth of 3-5 cm; without mulching, it is advisable to plant to a depth of 10-15 cm. This way, the plants will have enough moisture to form a head.
Improving soil characteristics for winter garlic
In addition to fertilizing with manure or humus, you can improve the structure of the soil on your site, but this can only be done correctly if you take into account the type of soil characteristic of your site:
- The soil in your garden belongs to the clayey category: for every square meter you need to add a kilogram of river sand and a kilogram of peat;
Clay soil is considered heavy, so it is not suitable for growing garlic without pre-treatment.
Growing and caring for spring garlic
Caring for this crop is easy. It is only important to treat spring garlic before planting in the spring, and also to ensure spacing between neighboring plants. Before starting work, the seed must be divided into cloves, while:
- it is better to choose them from the first (outer) row;
- too small ones must be rejected;
- remove dried and rotten ones;
- remove the fused ones. They have obvious signs of degeneration, so such cloves will not produce a good harvest.
How to germinate spring garlic before planting
Pre-planting material of spring garlic needs to be germinated a little, obtaining small roots 2 cm in size. To do this, it is enough to soak it first in potassium permanganate for several hours, and then in a growth stimulator for 30–40 minutes. After this, the teeth are wrapped in gauze and put in the refrigerator. The roots begin to grow from the first days, and they reach the desired length in just a week.
Important! If planting time is delayed (spring is cool), spring garlic should be taken out and ventilated periodically. If the roots have already begun to grow, it is better to transfer them to the cold compartment (closer to the freezer).
What to soak in and how to prepare spring garlic for planting in spring
Preparing spring garlic for planting in the spring necessarily includes soaking. It takes place in 2 stages:
- First, the selected cloves are kept in a 1% solution of potassium permanganate (light pink) for 3–4 hours. This allows you to disinfect the surface and destroy both harmful fungi and bacteria.
- Also, before planting, spring garlic should be soaked in a growth stimulant, for example, Epin, Kornevin, Zircon, NV-101. If you don’t have these products on hand, you can get fresh aloe juice and dilute it with water in a 1:1 ratio. Leave the planting material for 30–40 minutes.
After this, the solution is drained, and the wet cloves are placed in any natural fabric or gauze, folded in several layers. Wrap and place in a strong bag that does not need to be tied tightly. Then this bundle is sent to the refrigerator (compartment for fruits and vegetables), and on the desired day it is picked up and dropped off. If possible, planting can be done immediately after soaking.
Disinfection of planting material in potassium permanganate is carried out for several hours
Where is the best place to plant garlic?
There are no special requirements for a place to grow spring garlic in the spring. Selecting a suitable site is simple: it must be well lit (without shadows from trees, bushes or buildings) and located on a slight hill. It is not advisable to plant in lowlands where water accumulates. In this case, the bed can be raised a little by digging up the ground or installing additional wooden fences.
If possible, it is better to cultivate the crop in places where legumes, zucchini, pumpkin, oats, strawberries, wild strawberries or cucumbers previously grew.
You should not plant cloves in places where any root vegetables and nightshades were recently placed: tomatoes, potatoes, peppers, eggplant, radishes, carrots, beets, onions and others.
Preparing the soil for planting spring garlic
Garlic prefers fertile, light, loose soil - loam or black soil. It is advisable to prepare the site in the fall. To do this, clean it, dig it up and, if necessary, add 2–3 kg of humus or compost per square meter.
You can also add 200–300 g of wood ash. Fresh manure should not be added, especially in spring. As it ripens, it greatly heats the soil, so the roots of spring garlic can be seriously damaged when planted.
Important! If the soil is heavy and contains a lot of clay, when digging you should add 200–300 g of coarse white sand (per 1 m2).
At what distance and at what depth should spring garlic be planted?
The scheme for planting spring garlic in open ground differs in that the cloves are placed 2 times closer than those of winter garlic. The fact is that the bulbs of the “summer” variety are much smaller, so space can be saved.
When planting you should observe:
- the interval between adjacent holes is 4–6 cm;
- depth - no more than 2-3 cm.
Experienced summer residents take measurements by eye. Beginners can be advised to define depth as the width of two fingers placed together. The interval between landings approximately corresponds to the length of the little finger.
Advice! You should prepare the required number of spring garlic cloves for spring planting in advance. For example, in a bed 50–60 cm wide and 5 m long, you can make 2 furrows and plant a maximum of 200 pieces.
Classic planting pattern – 5 cm between adjacent teeth
How to plant spring garlic correctly in spring
After you have managed to properly prepare spring garlic for planting in the spring, you can begin the main procedure. The sequence of actions is as follows:
- Several furrows are made in the prepared bed at intervals of 25–30 cm.
- Vermicompost or complex fertilizer granules are placed in each of them (if fertilizing was not applied in advance).
- Plant the cloves in the ground, deepening them to 2–3 cm.
- Water with settled water and mulch with sawdust and wood chips. This layer will allow the soil to remain moist much longer and will also inhibit the growth of weeds.
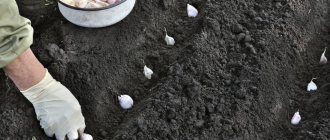
How to plant winter garlic
After all preparations of both the soil and the garlic itself have been completed, you can safely begin planting it:
- Make furrows up to twenty centimeters deep, placing them at a distance of twenty-five centimeters from each other;
In order for garlic to better cope with low temperatures, it is immersed in furrows
Dry peat or sawdust are excellent as mulch.
Timing: when in the fall?
Planting dates directly depend on the climate zone for growing winter garlic. The further north the climate zone is located, the earlier it is necessary to plant garlic :
- For central Russia this is the end of August - mid-September.
- For the southern part of Russia this is mid-September - early October.
In general, the planting time can be determined as follows: 20-25 days before stable low temperatures.
Important! Consistently low temperatures are less than +5 during the day and less than 0 at night. If the year is cold, you need to plant earlier; if a warm autumn is expected, the planting dates can be shifted slightly.
Possible problems and difficulties
As a result of unaccounted crop rotation, you can get a small harvest, fungal damage to crops, and weak sprouts in the beds.
Using fresh manure when cultivating the soil for planting, they subsequently encounter damage to garlic by mold, rot, and pests. Teeth without disinfection in a solution of potassium permanganate or copper sulfate may not germinate, freeze, or sprout damaged by diseases.
Too deep plantings lead to loss of seedlings. The growth of the root system is hampered by well-compacted soil under the teeth. Wet seed does not germinate; it freezes or rots.
Poorly mulched plantings will not withstand extreme cold. And those planted untimely may germinate ahead of time, which can lead to crop loss due to frost.
Harvesting garlic correctly
harvesting garlic
Planting material must be preserved from the end of July until the first half of October. To be sure of its quality, avoid incorrect actions already during the harvesting process. Mistakes made at this stage can affect both long-term storage of winter garlic until spring, and shorter-term storage - until planting in October.
- a week and a half before harvesting garlic, stop watering the beds;
- partially dig out the heads of garlic in advance so that they ripen;
- collect on a day when there is no rain;
- Do not pull the garlic out of the ground so that the stem does not remain in your hand and the head remains in the garden. Dig first, and not at an angle, so as not to damage the head. Use a pitchfork instead of a shovel;
- do not knock the heads of garlic on a pitchfork, fence or boot top, so as not to damage the cloves;
- Without cutting the roots and stems, place the heads of garlic in one layer in a wooden box and place the crop to dry under a shed or in a ventilated greenhouse for 5 days. Instead of a box, spunbond can be used as bedding material;
- set aside overripe garlic and damaged specimens for future culinary experiments;
- During storage, review the selected planting material - if you don’t like a particular head, set it aside.
Boarding time
In the fall, it is important to plant garlic before heavy frosts. At the same time, be careful with the weather conditions so that there is no temporary thaw. Garlic should not sprout and should not freeze. In the Moscow region, most often, work begins in late September - mid-October, approximately 35-45 days before severe frosts.
It gets colder in the Urals earlier; it is best to start planting from mid-September - October. It is important that the soil warms up by at least 6 degrees. In Siberian conditions, winter is usually early; snow may already fall in September; therefore, focusing on weather forecasters, they begin sowing garlic even from the end of August (with predicted early cold weather without a significant thaw) or from early to mid-September in a milder climate.
How to choose a variety
For comparison, up to 22 winter varieties and only 6 spring varieties are selected for planting in the fall. Among the main differences are the following nuances:
- Winter garlic has fewer cloves in its bulbs. Their number is approximately 5 to 10 pieces, but their size is much larger.
- In spring crops, the cloves are located chaotically, differ in size, and are more numerous in number (from 8 to 20 pieces).
- Winter varieties have even teeth, stumps are thicker and denser, and the structure of the bulb has a trunk in the center, unlike spring varieties.
- Only winter garlic shoots; among spring varieties, only the “Gulliver” variety.
- Sandy loam soils are chosen for planting winter varieties; for spring varieties, loamy soil that is not very heavy in structure is suitable.
- High frost resistance is characteristic of winter varieties. This garlic can withstand very low temperatures.
A significant difference between garlic species lies in the methods of planting them. By all known methods (cloths, bulbs, single-clothed bulbs) only winter varieties can be sown. Spring garlic, except for the Gulliver variety, is grown exclusively by cloves, since the species does not shoot.
Winter garlic varieties for planting
| Variety name | Ripeness degree | Qualitative characteristics | Yield level | Main advantages |
| "Alcor" | Mid-season | The bulbs are dense, round in shape. Color – pink-violet. Shoots. The weight of the bulbs is 13–36 g. | High yielding | Resistant to frost and yellow dwarf virus. Excellent keeping quality. |
| "Belorussian" | Early ripening | Dense bulbs, large, whitish-purple scales. Vegetable weight: 56–78 g. | Medium-yielding | Excellent winter hardiness. Weakly susceptible to bacterial rot. |
| "Gribovsky Jubilee" | Mid-season | Flat-round bulbs, the shape is elongated upward, the scales are colored purple. Shoots. Keeping quality is average. The weight of the bulbs is from 24 to 44 g. | High yielding | Resistant to cold, drought, disease. |
| "Lyubasha" | Mid-season | Flat-round bulb with white scales and purple veins. Very large. Keeping quality is good. | High yielding | Highly resistant to frost, fusarium, and drought. |
| "Sail" | Mid-season | Shoots. The bulbs are large, flat-round, elongated upward. The mass of the bulbs is from 30 to 47 g. They store well. | High yielding | Winter-hardy, weakly affected by bacterial rot, stem nematode, resistant to downy mildew. |
| "Sofievsky" | Mid-season | Large bulbs, medium purple scales, flat-round shape. Weight from 80 to 130 g. Shoots. Used only fresh. | High yielding | Resistant to frost and nematode. Excellent keeping quality. |
| "Saved" | Mid-season | Round-oval bulbs with gray scales. The weight reaches 80 - 100 g. It shoots. | High yielding | High resistance to severe frosts, nematode, fusarium. Excellent storage. |
All winter varieties often have a sharp taste.
The main difference between spring and winter varieties of garlic is the formation of a peduncle, a “arrow” on which the bulbs ripen. Spring varieties do not have a peduncle; they reproduce only by cloves. Winter crops have a peduncle; they reproduce both by cloves and by bulblets formed in the peduncle. Hence, winter varieties are called bolting garlic, and spring varieties are called non-shooting types of garlic.
In addition, spring and winter varieties are divided into table and industrial varieties. Table fruits include those fruits that contain a lot of pungent taste, essential oil and bitterness. These are also large varieties with large heads. Technical garlic includes garlic with a less pronounced burning taste and small, small cloves.
Note: almost all varieties of spring garlic are semi-sharp, technical. And all varieties of winter garlic are table varieties.
Various spring and winter varieties differ in their growing season. It can be 90 days (this is the minimum period for the formation of the head), for later ones - 125 days.
Another difference between spring varieties and winter varieties is that more garlic cloves form in their heads. If a head of winter garlic has 6-8 cloves, then a head of spring garlic will have 12-15 or 20 smaller cloves.
Here are the names of the most popular non-shooting spring varieties of garlic:
- Abrek – 15 lobes per head, ripens within 90-100 days. Head weight 30 g.
- Medicine - 10 lobes per head, ripens in 90-100 days, head weight - up to 40 g.
- Moscow - produces up to 15 cloves in the head, forms a harvest for 100-110 days. Head weight – 15-20 g.
- Victorio - up to 15 cloves, formed in 100-110 days, head weight 40-45 g.
- Demidovsky - 16 cloves, head up to 50 g, terms - up to 110 days.
- Permyak - 17 cloves, head weight up to 35 g, terms - up to 110 days.
- Degtyarsky - up to 18 cloves in a small onion, formed in 100-110 days. Bulb weight 35-40 g.
- Uralets - up to 20 cloves, head up to 35 g, terms - up to 110 days.
- Sochinsky - produces 30 cloves and forms especially large heads weighing up to 50 g. Formation time is 100-110 days.
- Saki - forms a head of 12-14 cloves, matures in 110-120 days. Bulb size – up to 20 g.
- Ukrainian white Gulyai-Polye (after the name of the settlement - Gulyai-Polye) - forms more than 10 cloves in the head, matures up to 120 days. Bulb size – up to 25 g.
- Alleysky - up to 18 cloves, with a ripening period of 120-125 days, bulb weight - up to 25 g.
And one more feature: spring garlic ripens longer than winter garlic - by 3-4 weeks. Therefore, in the northern regions it is recommended to grow only fast-growing varieties, for example, Lekar and Abrek. In central Russia there is a larger choice of varieties - Moskovsky, Degtyarsky, Permyak, Uralets, Demidovsky, Victorio.
In the southern regions, varieties of different ripening periods can be grown, especially late varieties of garlic - Saki, Ukrainian. Now let’s talk in detail about how to plant winter garlic in the spring.
In order to be successful in growing winter garlic, it is very important to choose a variety that is adapted to your area. There are varieties of garlic that shoot and do not form shoots. Those varieties that produce shoots are usually more hardy and winter-hardy.
- Lyubasha is a variety of Ukrainian selection with good winter hardiness and dryness, which can be perfectly stored for up to 10 months without loss of quality. The height of the stem is 90-120 cm, the number of cloves is up to 7 pieces, the average weight of one clove is 15-10 g. The bulb is white with barely noticeable purple veins.
- Ukrainian white is cultivated both as a spring and winter crop. The variety does not shoot, but is perfectly stored, the weight of the bulb is from 50 to 140 g, the number of cloves in the bulb is from 4 to 12 pieces.
We suggest you read: Is it possible to cover garlic with straw?