Disinfection of a polycarbonate greenhouse in the fall is a necessary preventive safety measure that helps eliminate infections and harmful insects, which is a guarantee of a good harvest in the future. Proper disinfection is carried out in several stages.
In the article we will explain in detail why treatment of the structure and soil is necessary, how to properly clean and wash the structure, and how to disinfect the greenhouse in the fall. Let's review drugs for disinfection against diseases, insects, and infections.
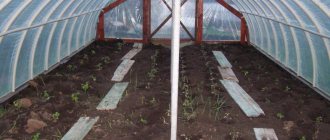
Disinfecting the greenhouse in the fall contributes to a good harvest next season
Why treat a greenhouse in the fall?
The greenhouse and the soil in it after harvesting can be infected with pathogenic microorganisms, fungi and various pests. All sorts of preventive measures will help get rid of them.
Experienced vegetable growers know that fungus, mold, and insect larvae that have overwintered in a greenhouse will be difficult to attack new seedlings in the spring and will be difficult to fight. For example, a whitefly can be destroyed when it is in the larval stage, since the adult is not afraid of even strong chemicals.
Therefore, it is better to disinfect the greenhouse and soil in the fall than to lose the future harvest due to pest attacks.
Cleaning the greenhouse in the fall
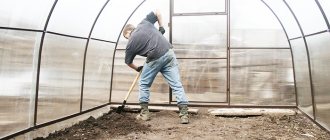
The autumn period is just right for thoroughly cleaning the greenhouse after harvesting. First you need to put the beds in order, clearing the soil of roots, mulch and plant debris.
It is especially important to remove remnants of tomato tops, which can infect future plants with late blight. Plant residues should not be put into compost; it is better to burn them, destroying bacteria and pests.
What cleaning work is carried out:
- Removing outside all the parts that served as support, pegs, garters.
- Pulling out gardening tools, winding up watering hoses.
- Collection and subsequent burning of tops, garbage, and uncollected rotten fruits.
- Detection and collection of insect larvae that appear on the soil surface.
- Digging up the soil, pulling out small roots and parasite larvae from it.
- Cleaning paths. If the paths are lined with tiles or other material, then they must first be swept and then sprayed with a hose with strong pressure.
Ways to disinfect a greenhouse
Where to start? And you need to start by clearing the greenhouse of plant residues and related materials used in growing crops: pieces of film, ropes, stakes. You should not put all this inside or near the greenhouse, because... pathogens and pests may remain on them. It is recommended to take everything out and burn it.
After the work has been done, a whole range of recommended activities follows:
- washing the walls of the greenhouse with disinfectant solutions;
- disinfection of the greenhouse and soil with sulfur or tobacco bombs,
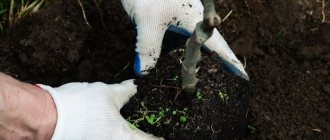
- replacing soil or deep digging of soil,
- soil freezing,
- chemical treatment,
- spilling biological products or herbal infusions,
- steaming the soil,
- sowing green manure.
By carrying out autumn preparation using one or more of these methods, you will ensure favorable conditions for your future harvest. With the onset of spring, it will be possible to begin planting work, spending much less time on preparation.
Tilling the soil in a greenhouse in autumn
After cleaning the greenhouse, you need to start cultivating the soil.
Soil replacement
In autumn, the soil in greenhouses is teeming with all types of microorganisms. The best treatment method is partial replacement of the soil.
By using fertilizers and insecticides in the summer, we unwittingly allow microorganisms to accumulate in the soil. In this regard, once every 2-3 years, 10-15 cm of the top layer of soil should be replaced with a new one. If you can replace 10 cm of soil with fresh, fertile soil, then this is an ideal option.
The removed soil can be placed in compost, scattered on beds, or spread under fruit trees.
After removing the old soil, it is advisable to bring in new soil and treat it with Fitosporin. We can’t leave it untreated, because we don’t know what pests live in it.
What to do if it is impossible to replace the soil?
In this case, you will have to prepare it yourself. There are several ways to cultivate soil in a greenhouse:
- Biological: the use of trichoderma green, which will destroy plant debris with pathogens located on them.
- Treatment with peracetic acid. For 1 liter of 9% vinegar, take 200 ml of 3% hydrogen peroxide. This mixture must be kept for 7-10 days in a dark place. One glass of this mixture per bucket of water is enough to treat the soil.
- Eradicating solution with iron sulfate. Add 1 tbsp to 10 liters of water. citric acid, 400-500 g of iron sulfate, 1 liter jar of urea. Stir, filter and thoroughly spray the soil surface before digging.
- At the same time, you can sow green manure. After the green manure has sprung up and grown properly, it must be sealed inside or mowed. It is recommended to dig up the soil in the greenhouse and turn the clod over.
In this video, popular video blogger and biologist Ivan Russkikh tells how to prepare peracetic acid for soil in a greenhouse and what advice it is better not to listen to.
Folk way
To disinfect the soil from pests, you can use the traditional method:
- Make a thick infusion of onion peels. It will rid the soil of blossom end rot fungi.
- Mix the soap solution with ash and pour it on the ground. This will rid it of powdery mildew, spotting, clubroot, and blackleg spores.
- A solution prepared from water and dry mustard will help get rid of many germs.
- Sprinkle dry bleach powder on the ground in an even thin layer, then dig it to a depth of 15-20 cm.
- Prepare hot water, spill the soil and cover it with film for a day. This event is held 3 times in the fall. It is effective against bacteria and pest eggs.
- You can also treat it with cold by opening the greenhouse for 5-6 days in frosty weather.
Processing times
Typically, a greenhouse structure made of polycarbonate sufficiently protects the interior space from external pollution, so many gardeners do not consider general cleaning of the greenhouse important before the start of the new planting season. In fact, preparation can change everything for the better.
The main principle for choosing the timing of treatment is based on the fact that it is necessary to clear the room of pests at the moment of their transition to the active phase of life. To do this, individuals and their larvae need time and a favorable temperature regime to wake up. The effectiveness of processing soil that has not yet thawed is reduced to zero.
If treatment with chemicals is planned, it is best to carry out it after a layer of soil 10 cm deep has thawed. It is important to maintain an interval between treatment and planting. It is better if it is at least 10 days before the planned planting of crops in the greenhouse.
The soil must be treated several weeks before planting seedlings and seeds. This is usually the period from late February to early March.
Additional treatment of soil in a greenhouse against pests
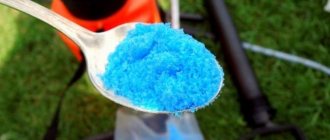
Copper sulfate (100 g per bucket of water) is considered a universal disinfectant. This is also an excellent fertilizer, but it can only be applied once every 5 years, otherwise the acidity of the soil will increase. The soil can simply be sprayed with copper sulfate.
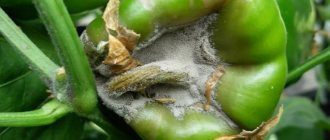
If you notice that the plants have been affected by powdery mildew, then fungicides will help get rid of this fungus:
- Topaz,
- Fitosporin,
- Quadris,
- Tiovit Jet,
- Gamair.
It is difficult to get rid of fusarium, but you can try to remove the fungus using the following means:
- Trichophyte,
- Gamair,
- Previkur Energy,
- Oksikhom.
If a spider mite has been noticed, then the soil must be treated with Bordeaux mixture, and then the entire room must be fumigated with smoke from a sulfur bomb.
Help to get rid of cladosporiosis or brown spot
- Pseudobacterin-2,
- Fitosporin,
- Polisher,
- Home.
Root rot mercilessly destroys plantings in a greenhouse. To remove it, you need to treat the soil with biological products.
- Baktofit,
- Gamair,
- Pseudobacterin-2,
- Planriz,
- Trichodermin.
There is no need to fear that the chemicals will damage the soil and destroy any future plant. If the treatment is carried out in the fall, then by spring everything will disappear and will not affect the harvest in any way.
Stage #4 – greenhouse disinfection
It is recommended to spray a greenhouse that has been cleared of dirt with a low concentration of Bordeaux mixture or a highly diluted solution of copper sulfate. This is prevention against gray rot, scab, rust, downy mildew and the eternal enemy - late blight.
Adherents of strict environmental principles can use a proven folk method - a decoction of pine needles. To do this, half a bucket of compacted pine branches is filled with water and infused. In the express version, cook for 20 minutes. According to experienced summer residents, pine needles can be replaced with nettle, a decoction or infusion of which is prepared according to the same recipe. There is an opinion that instead of pine branches it is permissible to use 200 g of pine extract from a pharmacy. These products help in the fight against late blight and other diseases of fungal origin.
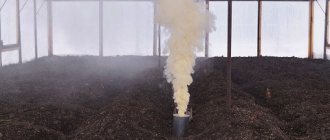
In buildings heavily contaminated with fungal diseases, it is recommended to carry out more effective disinfection by fumigation:
- cuttings of sulfur, which will require 1 kg per 10 m³ of area. For fumigation, you should stock up on metal baking sheets, crush the sulfur and mix it with an equal part of charcoal. The baking sheets with the mixture spread on them are placed in evenly spaced deep basins or similar containers. They set fire to the sulfur in the basins, close the door and ventilation transoms tightly and hastily leave the building, because... The sulfur dioxide released when the mixture burns is toxic. Therefore, sulfur disinfection procedures must be carried out with gloves, safety glasses and a gas mask, or at least a respirator;
- sulfur bombs, of which you will need 500g per 10³. The checkers are distributed and set on fire in the same way as in the method described above.
Before fumigation, all cracks are tightly caulked so that the smoky gases act on the structure and do not flow into space without leaving a trace. For ventilation, the disinfected greenhouse is opened no earlier than after 5 days, after which it must be ventilated for at least 2 weeks.
It should be remembered that sulfur dioxide destroys the metal parts of the greenhouse frame. Therefore, fumigation is considered a last resort, which should not be resorted to unless absolutely necessary. It should be abandoned outright if there are already lesions on the metal racks.
Fumigation is a general disinfection procedure, because Both surfaces and soil are treated. It kills both fungal diseases and larvae of harmful insects. Avid gardeners sometimes recommend doing it immediately after repairs. You just need to take into account that after fumigation, you will not be able to work in the greenhouse for 2 weeks, including removing weeds, digging up the soil and washing the structure. There is also a subtlety: a greenhouse with perennial plantings is disinfected with sulfur only in the spring.
Disinfection of greenhouse walls and structures in the fall
Now you can begin preparing the walls of the greenhouse. It is recommended to treat the walls in the greenhouse after the first soil preparation.
Disinfection of a polycarbonate greenhouse in the fall is one of the most important activities. Cucumbers, peppers and tomatoes are most often grown in a greenhouse, which can suffer from various diseases in greenhouse conditions. There are a lot of means to get rid of pathogenic microflora.
Many summer residents disinfect the entire greenhouse with a solution of potassium permanganate. Potassium permanganate can kill many parasites.
How else can you disinfect a greenhouse in the fall? Soda, formaldehyde (250 g per bucket of water), and 5% copper sulfate will cope with this task.
Watch this video in which Ivan Russkikh tells how to treat a greenhouse in the fall after finishing the tomato, pepper and cucumber crops. There is one inexpensive remedy available to everyone, which has proven to be the most effective for disinfecting a greenhouse from diseases.
Ivan Russkikh is a popular video blogger, expert of the Youtube channel “Procvetok” and the channel “Ivanova Science”. Researcher, teacher, head of the Research Laboratory of the Russian Center for Economics and Culture, member of international scientific communities.
The best solution for sanitizing walls is a white solution (hypochlorite). Prepare a solution: pour 1 liter of chlorine bleach White (the composition should contain sodium hypochlorite 25-30%) into 10 liters of water.
Within an hour after preparing the solution, spray the greenhouse with a sprayer. After a week, you can rinse the greenhouse with a sprayer with clean water.
You can also use chlorine-free peroxide bleaches, for example, Bos, Persol, Vanish, which contain perborates. We dilute the bleach as indicated in the instructions for bleaching laundry. The water should be hot, at least 60-70 degrees. We treat all surfaces of the greenhouse with a sprayer.
When using chemicals in a greenhouse, be sure to protect yourself from chemical fumes and splashes. Prepare protective items: respirators, aprons, goggles, rubber gloves. After treatment, immediately leave the greenhouse and wash yourself. And in the greenhouse itself, open the windows and doors to ventilate it.
When spring comes, your greenhouse will be clean, free of pests, mildew and mold. In addition, a clean, washed and treated structure will last longer.
Why you need to clean your greenhouse regularly
While a greenhouse provides an ideal environment to protect plants from harsh weather, it can also provide an ideal climate for unwanted pests. The tiny insects will thrive wherever you give them a chance, so they need to be controlled regularly. For example, midges will breed on organic debris. Pests and pathogens can live not only in plant material, but also on polycarbonate walls. Cleaning polycarbonate sheets thoroughly helps prevent the formation of algae and mold.
Even a little maintenance can go a long way in ensuring your plants thrive. Disinfecting your greenhouse gives your plants and the structure the best chance to thrive.
Washing the greenhouse and equipment in the fall
At the end of the summer season, all equipment, like the greenhouse itself, must be put in order and washed thoroughly. What to wash with? Take mops, brooms, rags.
Rinse the outside of the structure with water by pointing a hose at it.
If you were unable to disinfect with white, then the inside of the greenhouse wall can be washed with water and suds of laundry soap (1 piece per 10 liters of water) or dishwashing detergent. Apply the solution to dirty areas, and after 10 minutes, rinse with water. Rinse gardening tools in the same way.
What to do in the greenhouse in the fall with the frame structure? You need to pay close attention to these parts. Mold may appear at the joints, which will become a good breeding ground for fungi and bacteria.
These areas can also be washed with a concentrated solution of laundry soap. Laundry soap will well disinfect the joints of parts and everything that you wash.
You should not use a detergent with strong active ingredients, so as not to reduce the transparency of the greenhouse covering material.
Disinfection and washing of polycarbonate greenhouses in the fall with non-removable parts is carried out with a soap solution using brushes with long handles. After washing with soapy water, rinse off the soap with a hose.
If the polycarbonate has faded and even turned green in places, then you need to take 3 tablespoons of hot water per bucket. washing powder, ammonia, vinegar, a little bleach and mop the greenhouse. The greenhouse will become transparent.
The wooden frame should be treated with antiseptics, and for the metal frame it is necessary to prepare an anti-corrosion agent.
To disinfect all parts of the greenhouse, especially joints, you can use a solution of copper sulfate (100 g per bucket of water) or bleach (400 g per 10 liters of water).
A glass greenhouse can be washed with window cleaning liquid. It contains alcohol, which is also a disinfectant. Therefore, consider that glass disinfection has already been carried out. And the frames can be washed with a solution of laundry soap.
When should you wash a polycarbonate greenhouse in the fall? The best time is September, early October. These activities must be completed before stable frosts.
How to wash a greenhouse, how to make work easier
Motorists wash greenhouses with Karcher or other car washes and special nozzles for washing cars. In this case, the hose can be lowered into a tank with disinfectant. solution. And then rinse the surfaces from the water supply with clean water.
But if the polycarbonate is old or thin, high-pressure water can break it. We must first practice on some debris.
Girl gardeners wash with soft sponges, rags and mops.
Polycarbonate is washed with a soft old sponge
You can use a sprayer if you have a good pump sprayer or one with a pump. The container is filled with a disinfectant solution and then all surfaces are treated, especially in the cracks behind the frame.
The greenhouse is washed with a sprayer
Washing scheme:
- Apply a generous amount of soap solution to the surface that has been previously cleaned of cobwebs and debris, wetting all the cracks.
- Wait 20-30 minutes.
- During this time, you can wash the outside of the greenhouse.
- Rinse off the soap solution with clean water until the walls become transparent again.
The walls are rinsed with clean water from a hose.
That's it!
Preparing the greenhouse for winter
We have given different methods for treating the soil and walls of the greenhouse. All this will help create good conditions for the future harvest.
A Complete Guide to Winterizing Your Greenhouse
To put all the information in one place, watch this short video.
Preparing a greenhouse for tomatoes in the fall
In order to get a good harvest of tomatoes next year, in addition to disinfecting the soil, you should add fertilizers and lime to reduce the acidity level, and sow green manure.
When digging, it is useful to add ash, humus, manure, and compost. Tomatoes need potassium and nitrogen most of all.
In autumn, add to the soil:
- monophosphate – 40 g per 1 sq. m,
- double superphosphate – 20–30 g per 1 sq. m.
It will be useful to enrich the soil with preparations containing potassium, for example potassium magnesium.
How to treat the soil against late blight in spring
You can start by improving the soil health. To do this, you will have to use compost, to which you add special preparations. For example, “Baikal EM” or “Shine” . With their help, it will be possible to restore the number of microorganisms that are necessary for the normal development of cultivated plants.
But this is still not enough; special treatment of the land against late blight will be required in the spring. If the greenhouse could not be opened for the winter so that the ground in it is thoroughly frozen, then the soil can be thoroughly spilled with boiling water . You can also pour boiling water into the soil in the greenhouse in the fall. after harvesting when preparing the greenhouse for winter. Then cover it with film. This will ensure better soil steaming. It is only recommended to use this method of treating the soil against late blight in early spring. It is then that there is a chance to destroy late blight in this way.
Later, potassium permanganate will disinfect the soil well. Some summer residents mix it with chopped garlic. You can use not only the cloves, but also the leaves. One hundred grams of this plant needs to be crushed and poured with a glass of boiling water. Let it sit and then pour it into a bucket of water with one gram of potassium permanganate. It should be remembered that the maximum effect will be achieved only with good soil moisture. After such treatment, it is recommended to water the beds with a solution of beneficial microorganisms, for example, phytosporin . It will need to be taken in the proportion of 1 tbsp. spoon per liter of water. You need to use up this entire bucket for one square meter of soil.
Those gardeners who are fundamentally against chemicals in their garden will find information about traditional methods useful. Decoctions of pine needles or nettles are effective . In both cases, you will need half a bucket of branches or grass, which you need to pour boiling water over. It is enough to simply infuse the nettle, but the pine branches will have to be boiled for 20 minutes.
Treating the soil against late blight in the spring also includes digging. You can dig the soil in both spring and autumn. As already mentioned, under no circumstances should you bury tomato tops. Just burn it. She is a carrier of late blight. To treat the soil in the greenhouse, you can bury the stems of marigolds, calendula and dill shallowly (so that they have time to rot) with a pitchfork in the fall. This will disinfect the soil and fertilize it. We also recommend planting mustard in a greenhouse after harvesting. This is an excellent green fertilizer.
Late blight on tomatoes is a problem that harms not only novice gardeners, but also those who have sufficient experience in growing this crop. Therefore, do not despair. And carefully read all the recommendations. Then purchase early-ripening varieties of tomatoes that are resistant to late blight, which will have time to produce a harvest before the disease gains strength. And of course, carry out thorough sanitization. Experienced gardeners advise combining different methods. This achieves the best effect in the fight against late blight.